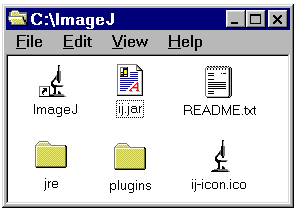
Download and expand the self-extracting ZIP archive to the C: drive. To run ImageJ, open the ImageJ folder and double-click on the ImageJ shortcut (a microscope with an arrow).
The "ImageJ" shortcut assumes the ImageJ folder is at C:\ImageJ. If this is not the case, right-click on the shortcut and edit the "Target:" and "Start in" fields of the "Shortcut" properties to reflect the new location. For example, if the ImageJ folder is located in the C:\Program Files folder, change these fields to
"C:\Program files\ImageJ\jre\bin\javaw.exe" -mx80m -cp ij.jar ij.ImageJ
and
C:\Program Files\ImageJ
(Note: the double quotes are required if there is a space in the target path.)
Creating a Desktop Icon
To create an ImageJ desktop icon, open the ImageJ folder, right-click on the ImageJ shortcut,
drag it to the desktop, release the right mouse button, and select "Create Shortcut Here"
from the popup menu. The ImageJ shortcut is the file you double-click to run ImageJ. It looks like this:
![]()
Requirements
ImageJ will run on a machine with 64MB but it runs better with 256MB or more, particularly when working with large images and/or stacks.
Memory
To increase the amount of memory available to ImageJ, right-click on the
ImageJ shortcut, select "Properties", click on the "Shortcut" tab, and edit
the -mx option in the "Target:" field.
The default is 80MB. For example, to increase the available memory from 80MB to 340MB, change
the "Target" line to
C:\ImageJ\jre\bin\javaw.exe -mx340m -cp ij.jar ij.ImageJ
To avoid virtual memory "thrashing" set the -mx option to
no more than 2/3 real RAM.
Note that the file you edit is the ImageJ shortcut
![]() and it must be the one you double click on to run ImageJ.
and it must be the one you double click on to run ImageJ.
Upgrading
To upgrade to the latest version of ImageJ, replace the ij.jar file in the ImageJ folder with a newer one from http://rsb.info.nih.gov/ij/upgrade/.
Drag and Drop
The Windows version of ImageJ opens images, text files, ROIs and LUTs dropped
on the title bar or menu bar of the "ImageJ" window. On Windows 2000/XP, it opens files dropped on the
ImageJ shortcut, but another copy of ImageJ is launched if ImageJ is already running.
Using ImageJ with Java 1.4
- Install the Java 1.4.1 SDK at java.sun.com/j2se/. (Do not install Java 1.4.2. It has a bug that causes ImageJ to crash when you use the Measure command.)
- Create a copy of the ImageJ shortcut by right-clicking on it, dragging, and selecting "Copy Here" from the popup menu. Rename the copy something like "ImageJ 1.4.1".
- Right-click on "ImageJ 1.4.1", select "Properties" from the popup menu, and edit the "Target:" field
so it looks something like
C:\sdk1.4.1\bin\javaw.exe -mx340m -cp ij.jar ij.ImageJ
where C:\sdk1.4.1 is the directory where you installed java 1.4.1.
- Copy (not move) tools.jar from C:\sdk1.4.1\lib to C:\sdk1.4.1\jre\lib\ext. (This is needed for the "Compile and Run" command to work.)
- Run ImageJ using Java 1.4.1 by doiuble-clicking on "ImageJ 1.4.1".

- ImageJ - A .lnk shortcut that runs ImageJ using the JRE (Java Runtime Environment) 1.1.3 in the jre folder. Assumes the ImageJ folder is at C:\ImageJ. You must edit the "Target" and "Start in" Properties if the ImageJ folder is moved to another location.
- ij.jar - This is a JAR file containing the ImageJ platform independent byte code (class files). It is the only file that needs to be replaced to upgrade ImageJ to a newer version. A JAR file is a ZIP file with a different extension. A JAR file can be opened with a ZIP utility such as WinZip. If Sun's Java 2 runtime is installed, you can run ImageJ by double-clicking on ij.jar.
- jre - This is a folder containing Sun's JRE 1.3.1.
- plugins - This is the folder used to store user-written plugins.
- ij-icon.ico - This is the ImageJ icon. It can be attached to a shortcut by clicking on "Change Icon" in the shortcut's Properties dialog box.